

.bin Gaussian Splat characters in real time. It drives characters with Humanoid or Generic animations. Characters and animations are generated by Viggle services; the plugin does not generate characters itself.
Recommended environment
1. Create a Unity project
- In Unity Hub, install Unity 6.3 LTS
6000.3.20f1. - Create a project with the Universal 3D or URP template.
- Wait for the initial Shader, Burst, and asset imports to finish.
2. Install the plugin
- Download and extract the ZIP package above.
- In Unity, open Window → Package Management → Package Manager.
- Click + in the upper-left corner and select Add package from disk….
- Open the extracted
com.viggle.splat-enginefolder and selectpackage.json. - Wait for Unity to import and compile the package.
com.viggle.splat-engine.
3. Import and run the sample
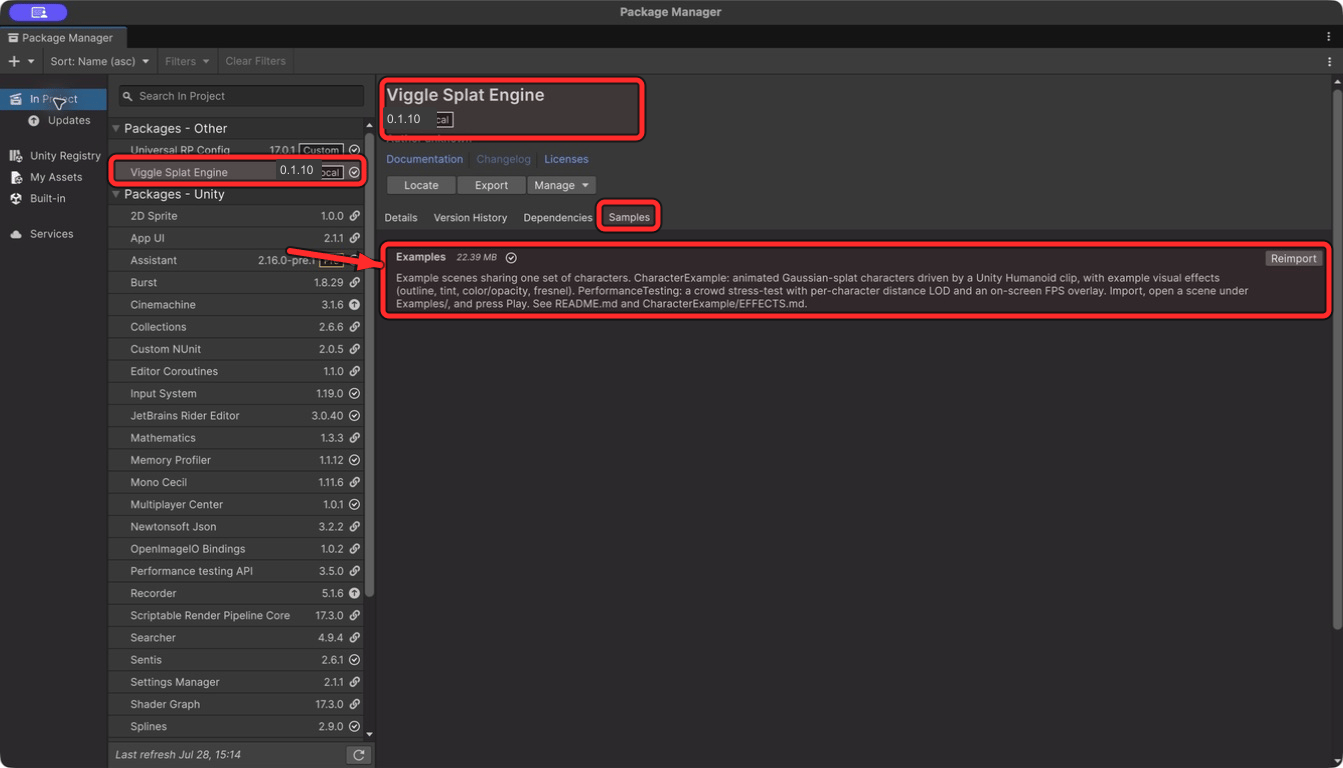
- Select Viggle Splat Engine in Package Manager.
- Open Samples, locate Examples, and click Import.
- Open
Assets/Samples/Viggle Splat Engine/0.1.10/Examples/CharacterRender/SplatCharacterExample.unity.
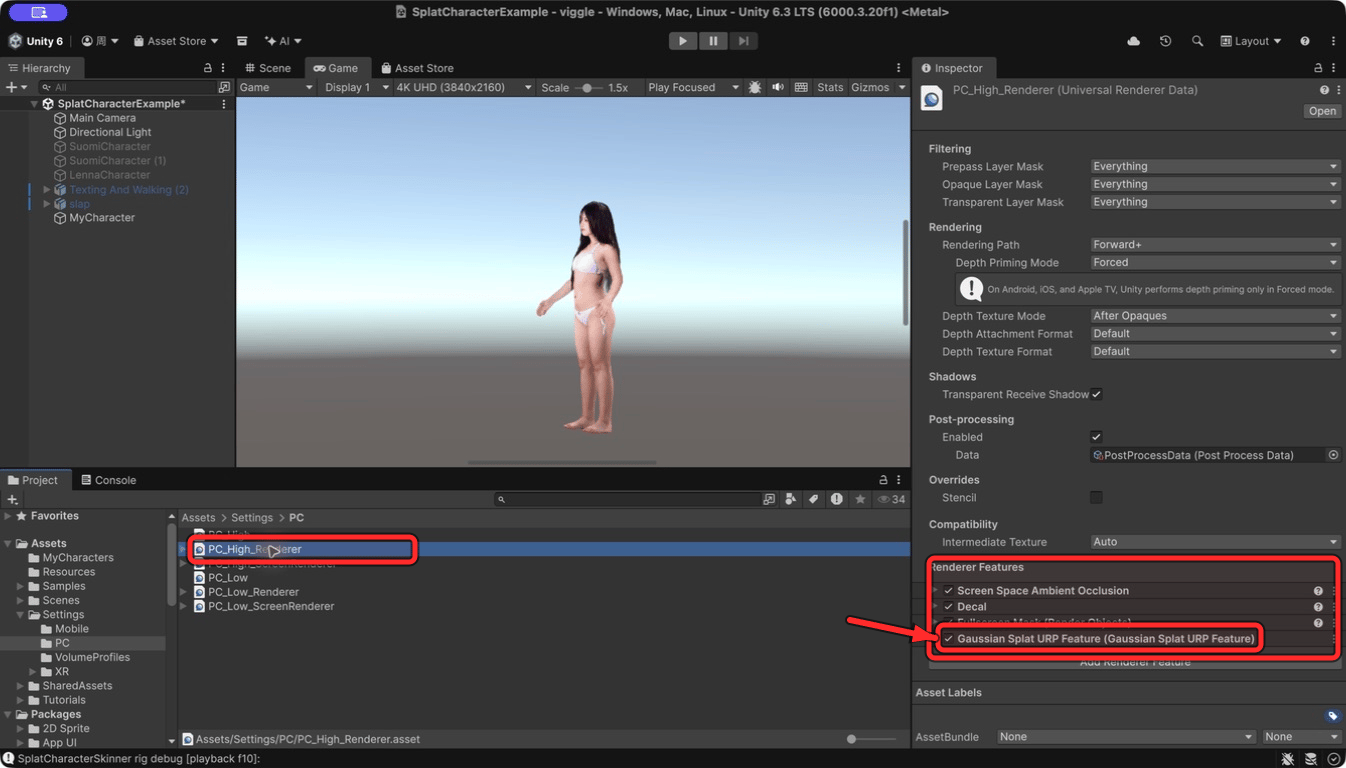
- Stop Play mode and locate the active Renderer Data in the Project panel, such as
Assets/Settings/PC/PC_High_Renderer. - In the Inspector, find Renderer Features and click Add Renderer Feature.
- Select Gaussian Splat URP Feature.
- Keep Render Graph enabled. Do not add
URP_COMPATIBILITY_MODE. - Enter Play mode. You can continue if the Console contains no red errors.
If the
.bin file is parsed and a Gaussian Splat Renderer is created but the Game view remains empty, the active Renderer Data is usually missing Gaussian Splat URP Feature.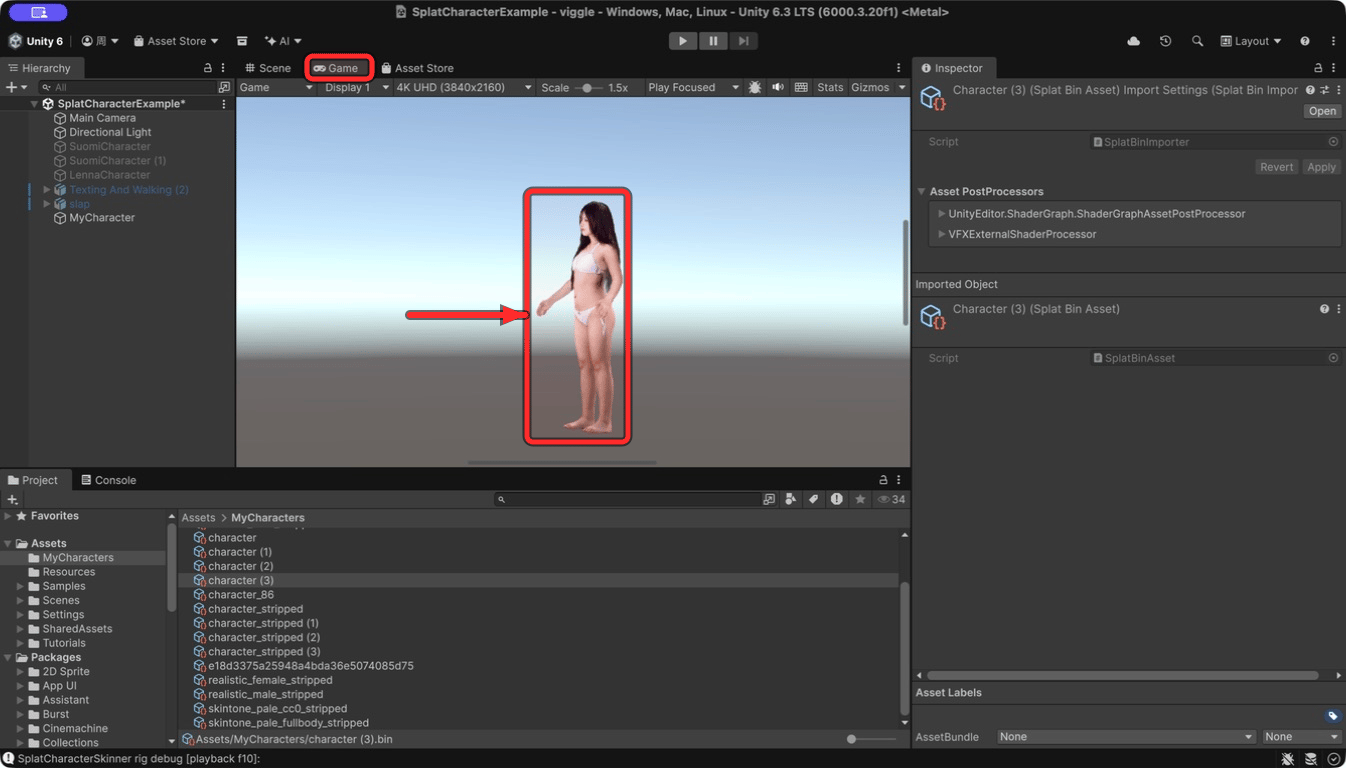
4. Load your own character
- Stop Play mode and import a VFCHARB1
.binfile intoAssets/MyCharacters. Its asset type should appear as Splat Bin Asset. - Create an empty GameObject named
MyCharacter. Set Position to0, 0, 0, Rotation to0, 90, 0, and Scale to1, 1, 1. - Add Splat Character Viewer and drag the
.binasset into Bin File. - Enter Play mode. The Viewer automatically adds Gaussian Splat Renderer.
MyCharacter in the Hierarchy and confirm that the .bin assets are visible in the Project panel:
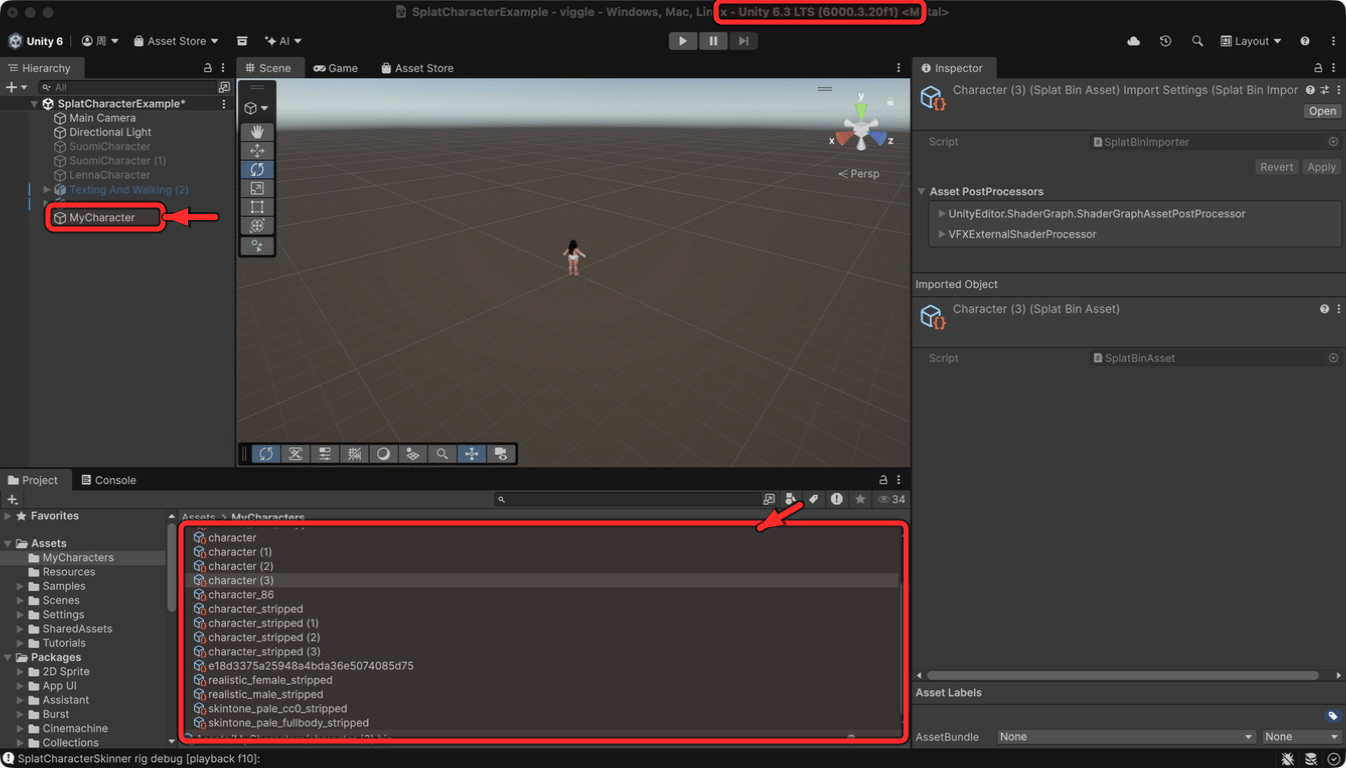
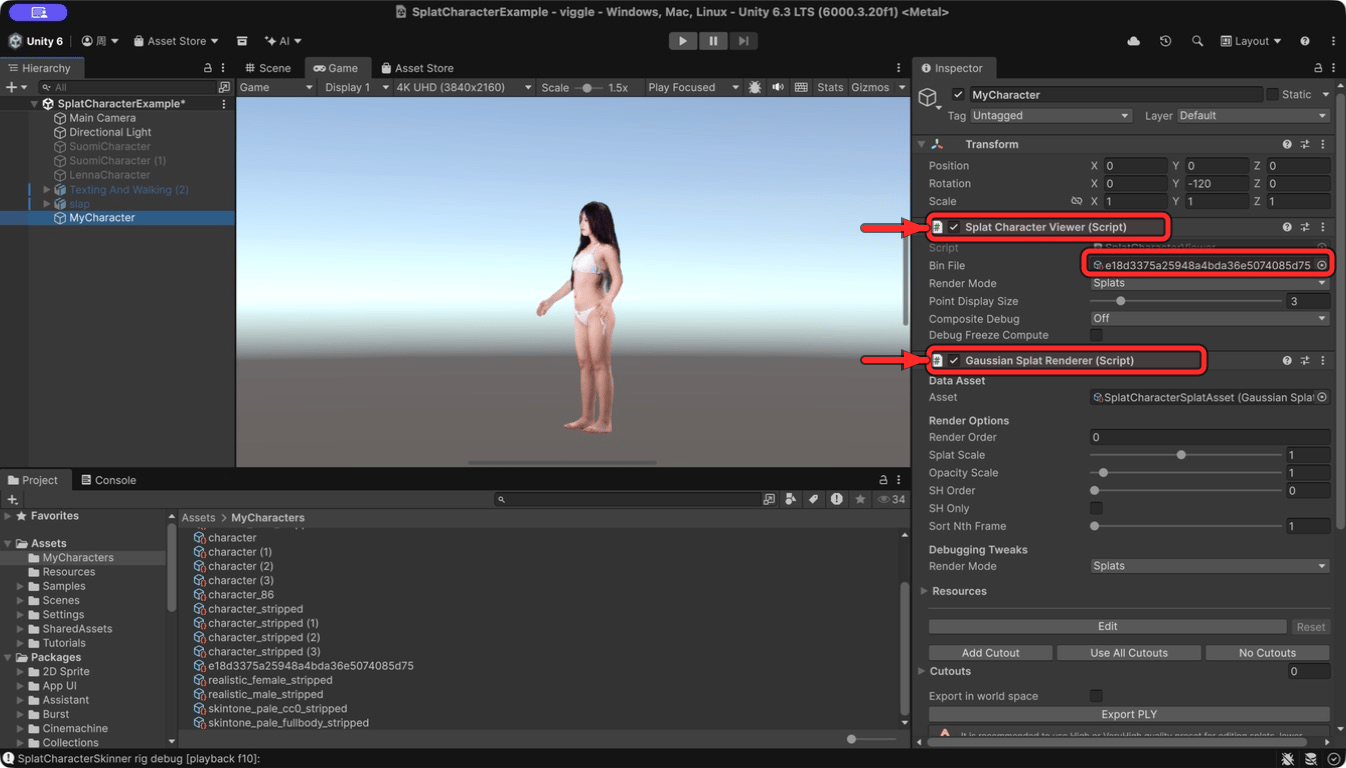
MyCharacter remain active. This prevents a sample character from being mistaken for your imported character.
If changing the .bin file does not update the character, stop Play mode, disable the Skinner, disable and re-enable the Viewer, re-enable the Skinner, and enter Play mode again.
5. Understand the animation assets
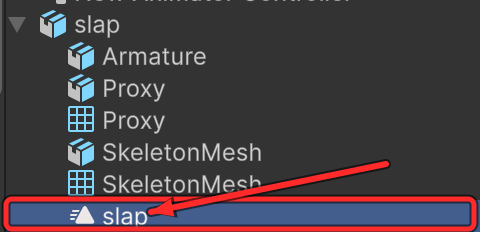
An animation FBX can contain a model root, an Armature, preview meshes, and one or more Animation Clips. Expand the FBX in the Project panel to see its sub-assets.
The Animation Clip has a triangular animation icon. Drag this clip into the Animator window. Do not drag the complete FBX, Armature, Proxy, or SkeletonMesh into the Animator Controller, and do not add the preview FBX to the scene unless you need it for comparison.
6. Import and configure an animation FBX
- Create a folder such as
Assets/MyCharacters/Animationsand copy the animation FBX into it. - Select the FBX in the Project panel and open the Rig tab in the Inspector.
- Choose the animation type:
For Humanoid animations, set Avatar Definition to Create From This Model, click Apply, and use Configure if Unity reports an invalid bone mapping.
7. Create an Animator Controller
- Stop Play mode.
- In
Assets/MyCharacters/Animations, right-click and select Create → Animator Controller. - Give the controller a descriptive name, such as
Chatting_AC. - Double-click the controller to open the Animator window. A new controller initially contains only Any State and Entry.
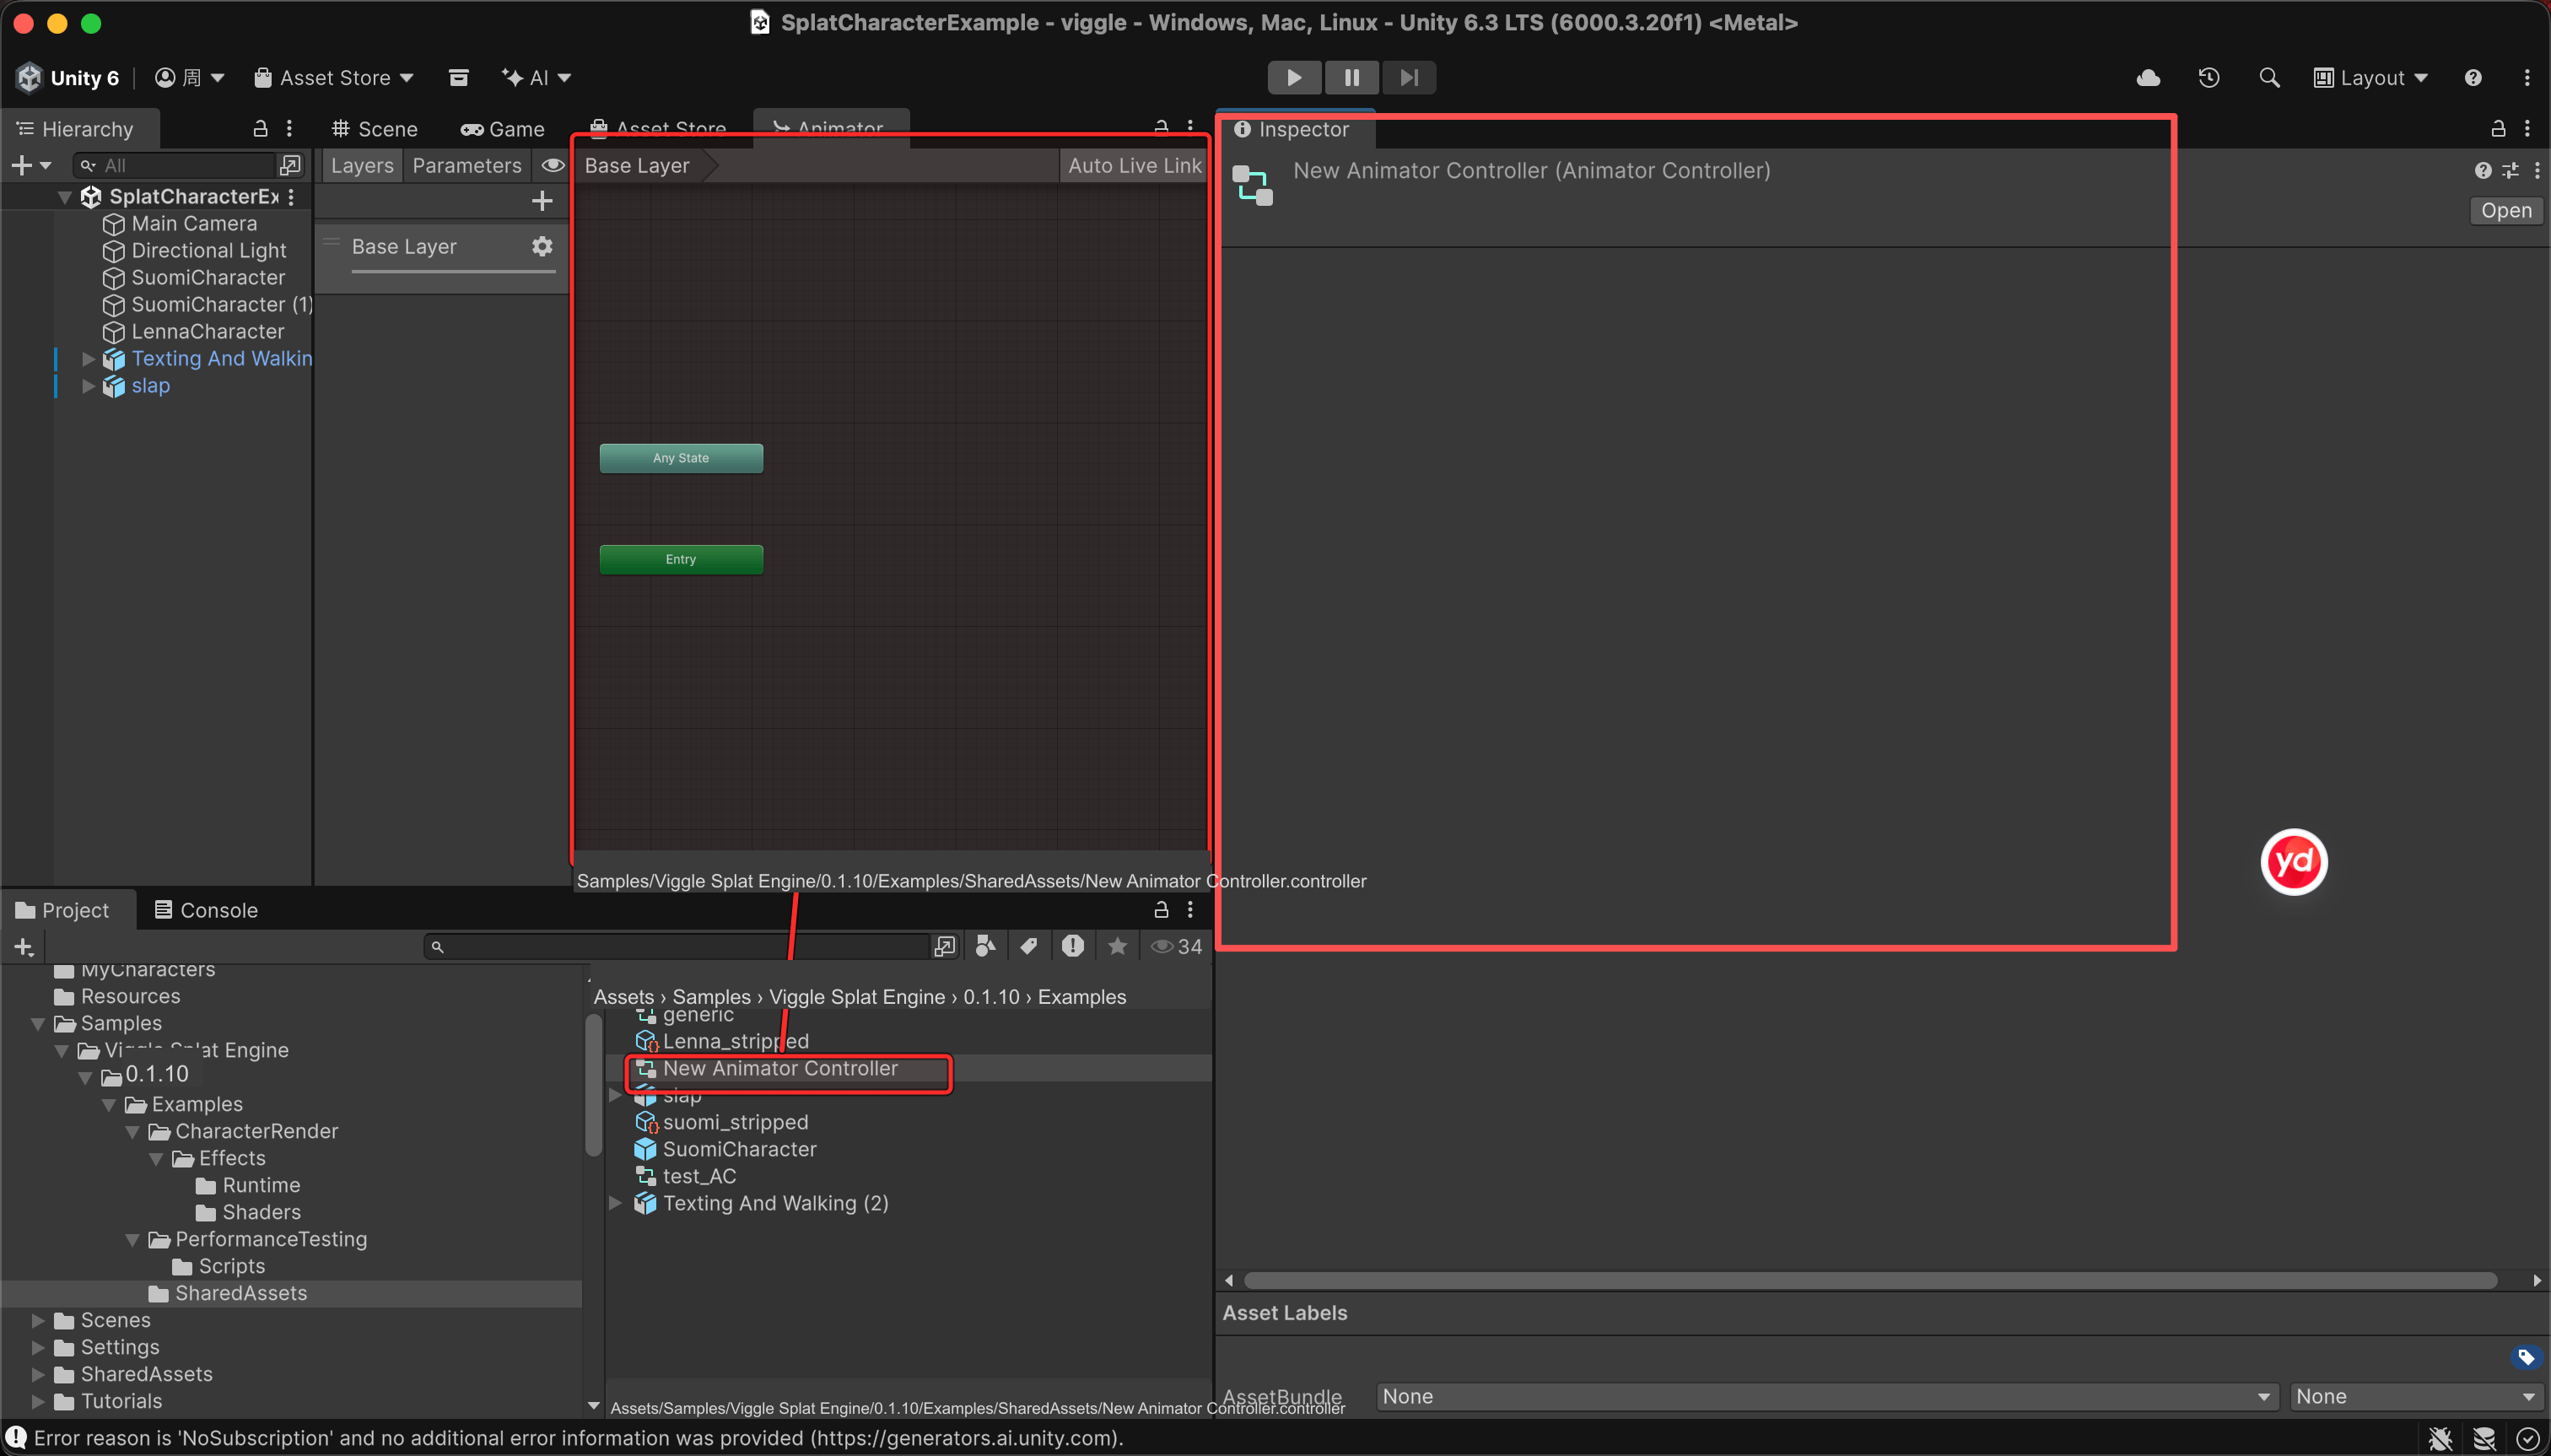
Store custom controllers outside
Assets/Samples. Reimporting or deleting the package samples can replace files inside the Samples folder.8. Add an Animation Clip to the controller
- Expand the animation FBX using the arrow beside its name.
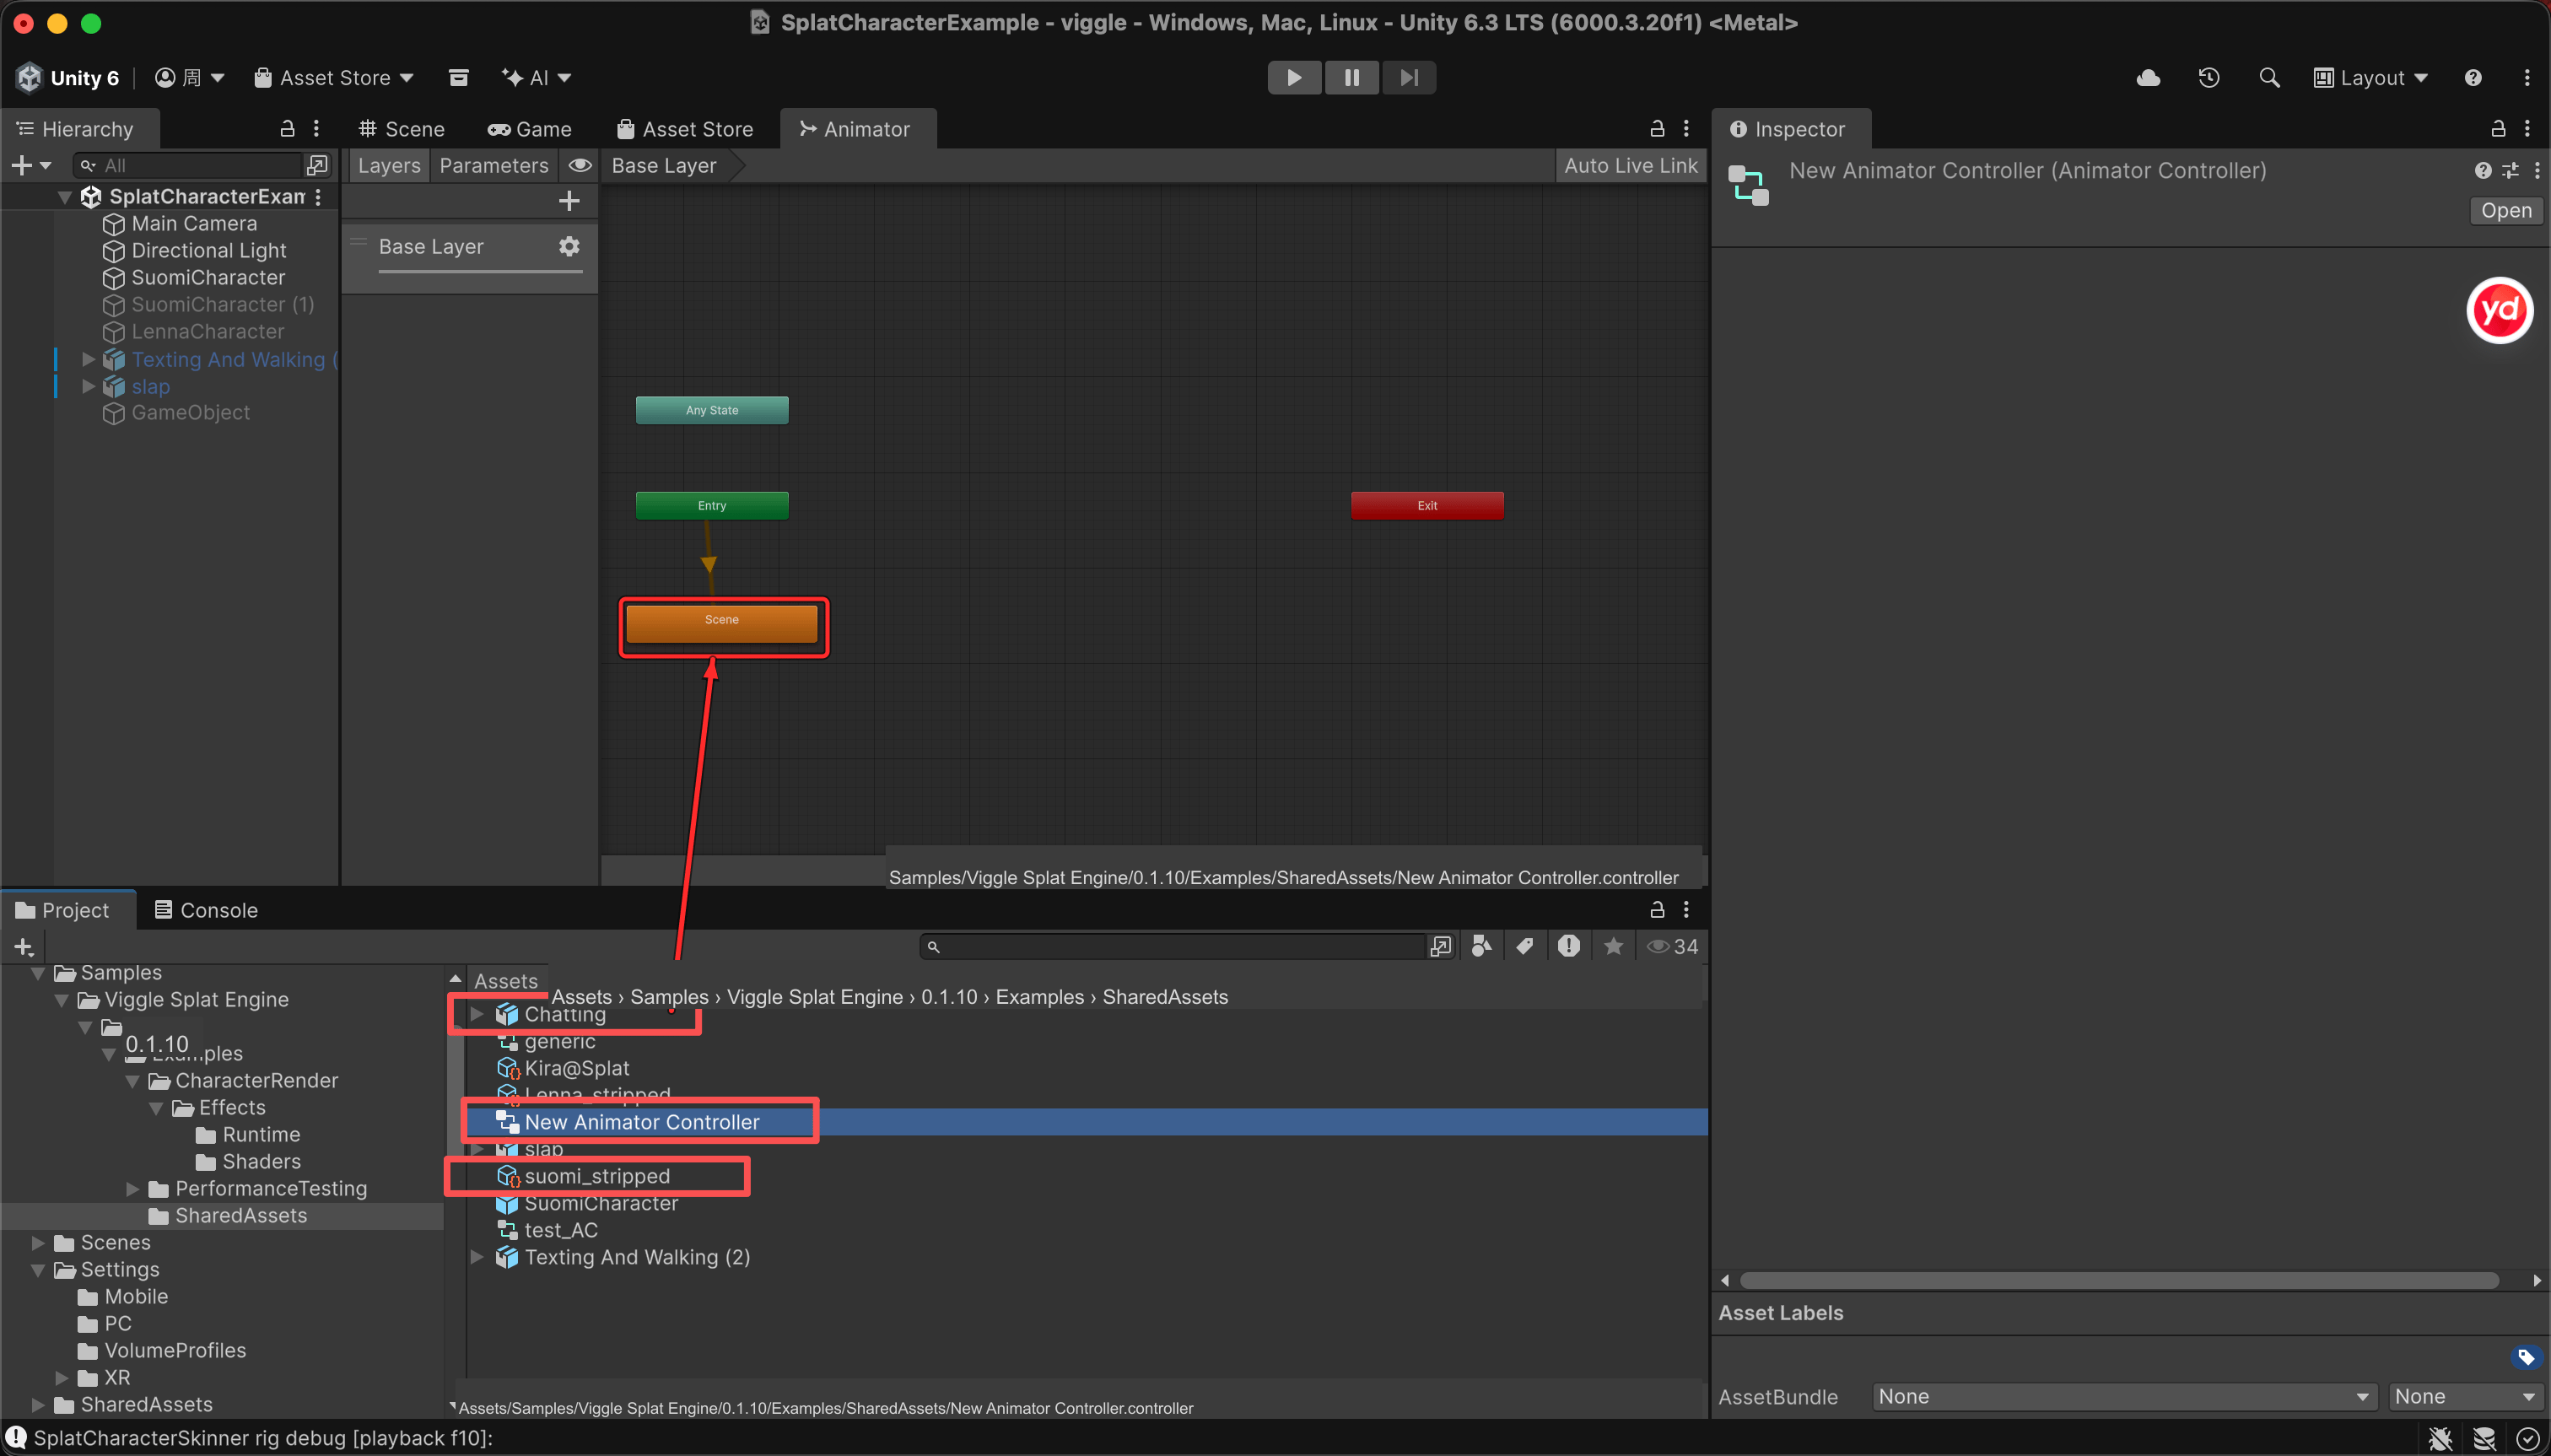
- Drag the Animation Clip—not the complete FBX—onto the Animator grid.
- Select the new state and confirm that its Motion field references the correct clip.
- The default state is orange and receives the arrow from Entry. If the state is gray, right-click it and select Set as Layer Default State.
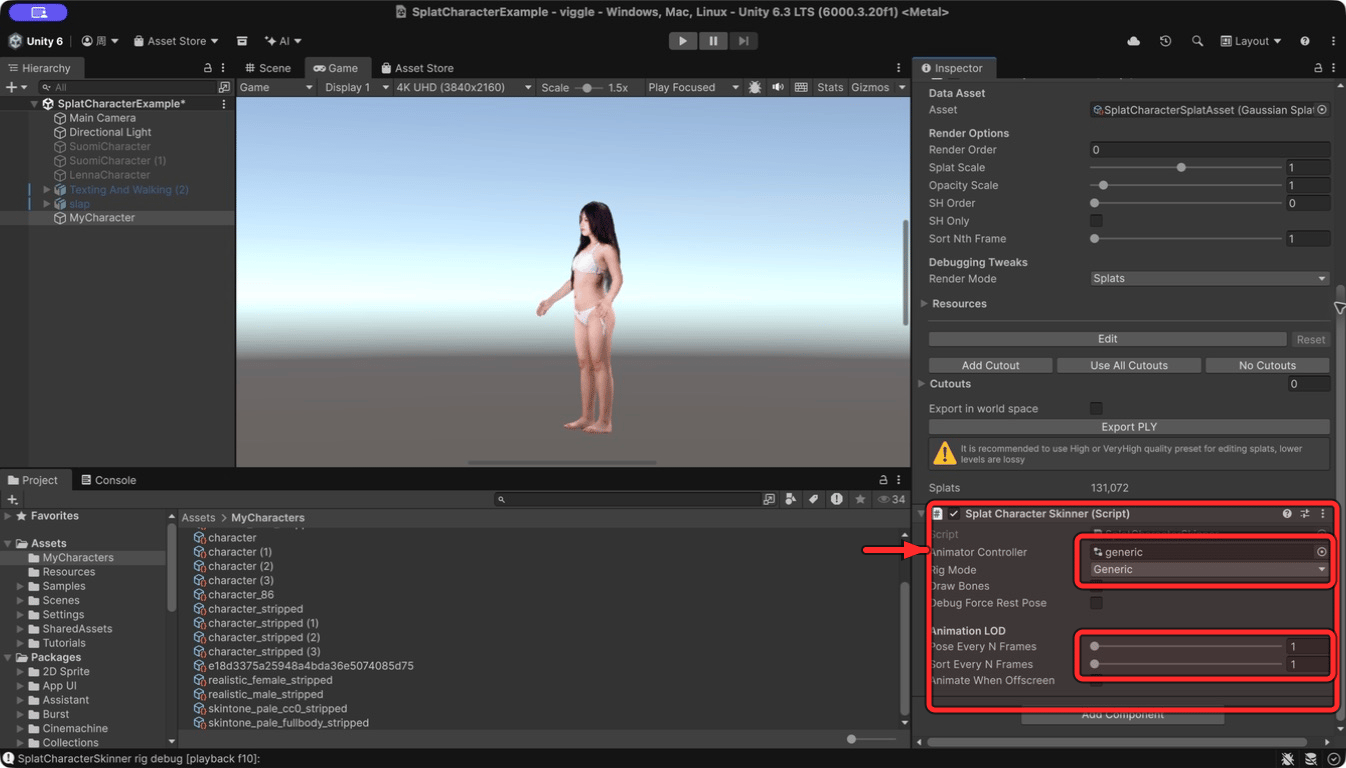
9. Assign the controller to a Splat character
- Select
MyCharacterorSuomiCharacterin the Hierarchy. Do not select the source FBX. - Add Splat Character Skinner if the character does not already have it.
- Assign your controller to Animator Controller.
- Set Rig Mode to the same type used by the animation FBX.
- For initial testing, set Pose Every N Frames and Sort Every N Frames to
1. - Enter Play mode and test in the Game view.
10. Loop an animation
- Select the animation FBX in the Project panel.
- Open the Animation tab in the Inspector.
- Select the clip in the Clips list.
- Enable Loop Time and, for a smooth pose transition, Loop Pose.
- Click Apply.
- Keep this clip’s state as the orange default state and do not create a transition from it to Exit.
11. Add multiple controllable actions
Drag additional clips into the same Animator Controller and create parameters such as:
Create transitions with conditions, for example Idle → Walk when
Speed > 0.1, Walk → Idle when Speed < 0.1, and Any State → Slap when the Slap trigger is set. Enable Has Exit Time on Slap → Idle so the one-shot action can finish.
The plugin creates the Animator on its runtime rig. After the character has initialized, gameplay code can access it and set parameters:
Troubleshooting
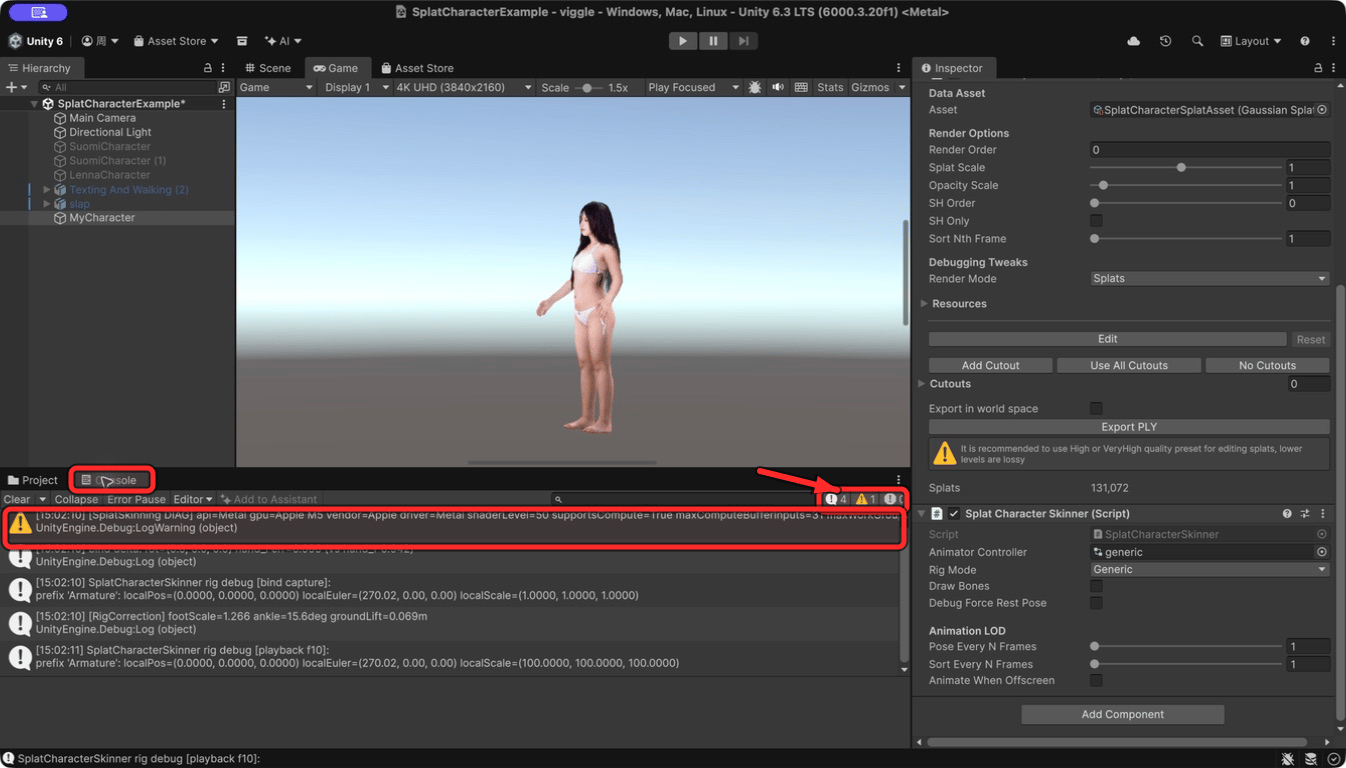
The icons in the upper-right corner of the Console show Log, Warning, and Error counts. The example below is a valid test state with
0 Error; the Metal diagnostic warning does not block playback.
Performance and limitations
- In scenes with multiple characters, set the Pose and Sort intervals of background characters to
2–4and use Splat Character Lod. - If performance is limited, begin testing with Splat Fraction
0.25–0.5and Render Scale0.5–0.75. - Splats are not affected by Unity lights, shadows, reflection probes, or lightmaps, and they do not write to the Z Buffer.
- The plugin does not support MSAA. Use Metal, DirectX 12, or Vulkan.